
Updated for 2026 · 18 min read · For events, marketing, and brand teams
You spend tens of thousands of dollars getting people into a room. Your booth, your flights, your hotel rooms, all of it to get 30 seconds of face time with a prospect. And then they walk away. What follows them out the door is the only marketing asset that keeps working after the event ends.
That's event merch. Not a pen with a logo stamped on it. A thoughtfully selected, on-brand product that a real person uses for months, every time associating your brand with utility, quality, and care. Done right, branded merchandise is the highest-ROI channel in your event marketing stack.
But most companies get it badly wrong. They order too late, pick the wrong products, blow the budget on items that end up in a landfill, and have no system for repeating success. This guide fixes all of that. We've drawn on Sunday's experience managing merchandise for 700+ events globally, from SaaStr to Salesforce World Tour, to give you a replicable, step-by-step framework for planning event merch that performs.
Whether you're planning your first trade show appearance or rationalising a 50-event annual calendar, these 10 steps cover everything: from setting goals in week one to building a reusable playbook you can deploy in 30 seconds next time.
Why event merch matters: the numbers
Before we get into the framework, here's why merchandise consistently outperforms every other event marketing line item, and why under-investing in it is one of the most expensive mistakes B2B teams make.
- 89% recall after two years: 89% of recipients can still recall the brand on a promotional item two years later, according to PPAI Consumer Study. No other channel, paid, organic, or owned, comes close to that retention window.
- 52% booth lift: 52% of trade show attendees are more likely to visit a booth that offers branded giveaways, per Exhibitor Magazine research. Merch isn't a giveaway, it's a traffic driver.
- 40% average cost savings: Sunday customers who centralised event merch operations report 40% lower total merchandise costs versus running multiple local vendors.
Pro Tip: Sunday customers who plan event merch more than 8 weeks in advance save an average of 22% on unit costs and report higher satisfaction with product quality. Use the 10-step framework below to build that lead time into your calendar. See how Sunday's platform works →
The old way vs. the Sunday way: how event merch planning has changed
Most event merch failures trace back to the same outdated process: one person, a spreadsheet, three email chains with a single supplier, and a panic order two weeks before the event. The modern approach is centralised, data-driven, and end-to-end, and it consistently delivers better products at lower cost with less stress.
| Dimension | Old approach | New approach (Sunday) |
| Planning lead time | 2-4 weeks before the event; constant rush orders | 10-12 weeks out; phased milestones with buffer time built in |
| Supplier model | Multiple local vendors with different catalogues; no consistency | Central merch partner with global reach; live pricing on 500+ products |
| Design process | Back-and-forth emails with a rep; mockup takes days/weeks; revisions costly | Instant on-brand mockups in the platform; approve in minutes |
| Budget management | Estimates only; invoices arrive after delivery; no cost breakdown | Live per-unit pricing; full cost visibility before you commit |
| Product selection | Unfiltered catalogue with thousands of untested options; no performance data | Data-informed tiering; catalogue filtered by event type and audience |
| Logistics & shipping | Ships to one address; team hand-carries to venue; frequent losses | Direct-to-venue delivery in 200+ countries; real-time tracking |
| Post-event learning | No data collected; same mistakes repeated each cycle | Order history, cost-per-event reports, and inventory analytics |
| Scalability | Every event is a new project from scratch; no repeatability | Reusable brand store; one-click reorder; global team access |
Common Mistake: The single biggest event merch error we see, teams treat merch as an afterthought and begin sourcing at the 3-week mark. At that point, your product options shrink by 60%, rush fees add 25-40% to unit costs, and quality control goes out the window. Start at week 12, not week 3.
How to plan event merch: the 10-step framework
These 10 steps take you from blank calendar to fully delivered, on-brand merchandise, with Sunday handling design, production, and logistics end to end. Each step includes the key decisions, common pitfalls, and exactly how the Sunday platform removes friction at every stage.
Step 1: Define your event goals & build your timeline
Best for: Setting the foundation
Everything downstream, product selection, budget, quantities, logistics, depends on getting clear about why you're at this event and what success looks like. This is not a 10-minute exercise. Block two hours with your events lead, your brand team, and whoever holds the budget. The clearer your goals, the less waste you'll have in every step that follows.
Key decisions to lock in:
- Set the primary event objective (lead gen, brand awareness, pipeline acceleration, partner engagement)
- Define your target audience and expected attendance volume
- Establish your 12-week milestone calendar with hard deadlines
- Assign a single merch owner with sign-off authority
- Confirm event date, venue, and delivery address (including floor restrictions)
- Lock in whether merch ships to venue or to your office first
What works: Written brief with sign-off before any products are selected. 12-week timeline with named owner for each milestone. Separating "must-have" from "nice-to-have" products early. Building a 10% contingency into quantity estimates.
What fails: Starting product selection before goals are agreed. No single owner, decisions by committee cause delays. Underestimating lead times for custom items. Forgetting to confirm venue delivery rules and customs requirements.
Why this step wins: Teams that document their event brief before touching a product catalogue reduce last-minute changes by 70% and avoid the most expensive rush fees. A 2-hour investment at week 12 saves 20+ hours of chaos at week 2.
"We used to start merch planning two weeks before the event. Now we start at week 10 and the quality difference is night and day, better products, better prices, zero stress." - Events Lead, European SaaS company
Step 2: Build your budget allocation framework
Best for: CFO-ready planning
Budget is the constraint that shapes every other decision. The most common mistake is treating merch as a residual, "whatever is left after booth and travel." That leads to cheap products that embarrass your brand. Instead, treat merchandise as a primary line item, because it's the only thing attendees take home. The Sunday pricing page gives you live unit costs before you commit to anything.
Recommended budget split for a typical event:
- Merch & giveaways: 25-30%, your highest-ROI, longest-lasting investment
- Booth space & setup: 25-30%, registration, construction, signage, power
- Travel & accommodation: 18-22%, flights, hotels, ground transport
- Pre/post marketing: 12-15%, email, social, direct outreach, follow-up
- Contingency: 8-10%, re-orders, damage, customs delays, last-minute needs
Smart budget moves: Consolidate multiple events into one bulk order, major savings. Use Sunday's live pricing to model cost per impression. Invest more in fewer, better products, quality beats quantity. Reserve 15% of merch budget for VIP / Tier 3 gifts. Volume discounts kick in fast: ordering 500+ units typically drops unit cost by 35-50%.
Budget killers: Rush order fees (adds 25-40% on top of unit cost). Unexpected customs/duty charges for international events. Over-ordering generic items that never get used. Paying for storage you didn't budget for.
Why this step wins: According to PPAI research, a single promotional item generates an average of 344 impressions per month. At a unit cost of €8, that's a CPM below €0.08, cheaper than almost any digital channel. The budget case writes itself.
"We saved over 40% on total merchandise cost by centralising all 700+ annual events through Sunday. The volume visibility alone was a game-changer." - Triana, Head of Global Events
Step 3: Product selection & audience tiering
Best for: Maximising booth traffic
Not every booth visitor deserves the same investment. The most effective event merch programmes run three tiers: traffic drivers for anyone who stops by, engagement rewards for prospects who spend time with you, and VIP gifts for key accounts and hot leads. This tiered approach stretches your budget further and creates a natural lead-qualification mechanism. Browse the full Sunday product catalogue, 500+ items across all three tiers.
The product tier framework:
- Tier 1: Traffic drivers (€3-8/unit): tote bags, pens, stickers, lanyards, high volume, logo-forward, given to anyone who visits the booth
- Tier 2: Engagement rewards (€12-30/unit): t-shirts, water bottles, notebooks, given to qualified leads who complete a conversation or demo
- Tier 3: VIP gifts (€40-120/unit): premium hoodies, tech kits, curated boxes, reserved for hot accounts and target prospects
Selection rules that work: Match product utility to your audience (tech crowd → USB hubs; outdoor event → water bottles). Choose items with long shelf life, 81% of recipients keep promo products for over a year. Staff apparel is its own category, a cohesive team look builds booth credibility.
Best performers across our 700+ events: Tote bags (used throughout the event and long after). Branded insulated bottles (high perceived value, long life). Quality t-shirts (wearable brand ambassadors). Tech accessories like USB hubs and chargers (near-universal utility).
Poor performers to avoid: Generic stress balls (low utility, low recall, high landfill rate). Cheap branded pens (associated with low brand value). Candy with a logo (zero lasting impression). Items that don't match the audience's lifestyle or needs.
Why this step wins: Tiering isn't just about cost control, it's a lead qualification signal. When a prospect accepts a Tier 3 gift, they're telling you they want a relationship. Your follow-up sequence should treat them accordingly. This single tactic consistently lifts post-event conversion rates.
"73% of people who receive a promotional item from a trade show use it at least once a week, with 45% using it daily." - PPAI Consumer Study
Step 4: Supplier selection, what to look for
Best for: Eliminating supply chain risk
Your supplier is either your biggest risk or your biggest competitive advantage at an event. Most merch disasters, wrong colours, late delivery, poor print quality, trace back to the wrong supplier choice. The criteria below are what separate a reliable partner from a liability. Sunday's vetted production network handles quality control and logistics end to end, removing this risk entirely.
Supplier evaluation criteria:
- Production lead times: confirm realistic timelines in writing, not "approximately 2 weeks"
- Quality certification: ask for physical samples before committing to a full order
- International shipping: can they deliver direct to venue in your event's country?
- Customs & compliance: do they handle EU/UK/US import documentation automatically?
- Minimum order quantities: flexible MOQs matter for smaller or test events
- Reorder speed: what's the turnaround if you need 200 more units at short notice?
Signs of a great supplier: Proactively flags production risks before deadlines hit. Sends digital proof AND physical sample on request. Has a direct line you can call, not just a ticket system. Offers real-time shipping tracking with event-date guarantees.
Red flags: Vague delivery windows ("7-14 business days"). No physical samples offered before bulk order. No experience with direct-to-venue shipping. Requires full payment before any proof is approved.
Why this step wins: Sunday's production network is pre-vetted across quality, lead time, and international logistics, which is why customers report a 60% reduction in merch turnaround time versus managing suppliers independently. You're not outsourcing to a single vendor; you're accessing a managed global network.
"Sunday transformed how we handle event merchandise across our global offices. From design to delivery, the entire process is seamless. We've reduced our merch turnaround time by 60% while maintaining exceptional quality." - Luisa Gobbo, Brand Marketing Lead
Step 5: Design, brand approval & production sign-off
Best for: Brand consistency at scale
Design is where most merch programmes stall. A 3-round email approval process with your brand team can eat 2-3 weeks of your timeline. The answer is a platform where your brand guidelines are locked in once, and every subsequent product automatically renders in your colours and logo placement, no briefing required. That's exactly what the Sunday platform delivers: branded mockups in 30 seconds, approval workflows built in.
Design & approval process:
- Upload brand assets once (logo files, colour codes, fonts), applied to all products automatically
- Generate digital mockups instantly, no waiting for a rep to build them
- Set brand approval gates, only approved designs go to production
- Request physical samples for Tier 2+ products before bulk order placement
- Set print position, colour mode (Pantone/CMYK), and decoration method per product
- Store approved designs in your brand library, reuse across future events
Design best practices: Keep it clean, logo plus one brand element beats cluttered designs. Test on both dark and light colourways before approving. Use embroidery for premium items; screen print for volume. Include event name or date only if you want a collectible effect.
Design pitfalls: Approving only a digital mockup, always get a sample for new products. Low-res logo files causing pixelated print results. Too many colours in the design, increases cost and print risk. No back-up design file if a vendor relationship breaks down.
Why this step wins: Sunday's brand-locked platform means your team in Amsterdam, New York, and Singapore can all order the same product, in the same colours, with the same logo placement, without a single email to a designer. Brand consistency becomes automatic, not effortful.
"We've partnered with Sunday for over five years. We even developed our own custom heavyweight T-shirt pattern. Today we execute employee welcome kits, event merchandise, and ABM campaigns globally, all through Sunday." - Luis, Chief Marketing Officer
Step 6: Last-mile logistics & on-site distribution
Best for: Zero-stress event day
Getting merch to the venue is harder than it sounds, especially for international events. Customs delays, venue delivery windows, floor weight limits, storage restrictions, and setup timelines can all derail a perfect order. Sunday's logistics engine handles direct-to-venue shipping in 200+ countries, with event-date guarantees and real-time tracking so you always know where your merch is. See how Sunday's logistics work.
Logistics checklist:
- Confirm venue delivery window (most convention centres have strict move-in hours)
- Check whether the venue accepts advance shipments and has on-site storage
- Confirm customs requirements for the destination country at least 6 weeks out
- Label all boxes clearly: company name, booth number, event name, contact number
- Plan on-site storage and distribution point, do not unbox everything at once
- Build a daily stock check into your team schedule to avoid running out mid-event
Logistics wins: Direct-to-venue delivery, no team hand-carrying boxes on planes. Real-time tracking with SMS/email alerts for your events team. Separate Tier 1, 2, and 3 items in clearly labelled boxes. Keep a 10% reserve of Tier 1 items at your hotel as backup.
Logistics disasters: Missing the venue's delivery window, merch arrives after day 1. Customs hold on items not declared correctly, 5+ day delays. All merch in one large box, staff rummage for items all day. No tracking info, team doesn't know if order is coming.
Why this step wins: Sunday's "In-Time Event Delivery" guarantee means your merch arrives at the venue before your team does, tracked, labelled, and ready to unbox. Sunday customers shipping to 50+ countries report zero customs-related delays, because the platform generates all required documentation automatically.
"With teams in over 70 countries, managing branded merchandise was a logistical nightmare. Sunday centralised everything, from design approval to global distribution. It's been a game-changer." - Dawn Gartrell, Global People Experience
Step 7: Staff briefing, apparel & booth activation
Best for: Booth performance
Your merch is only as effective as the people handing it out. A Tier 3 gift given to an unqualified lead is wasted money. A Tier 1 item handed over without a conversation is a missed opportunity. Your staff briefing should cover who gets what, when, and why, and your team apparel should make your booth instantly recognisable on a busy show floor. Order staff apparel as part of your main order through the Sunday catalogue.
Staff activation checklist:
- Brief every booth staff member on the three-tier merch distribution rules
- Define qualifying questions that unlock Tier 2 and Tier 3 items
- Order matching staff apparel (polos or t-shirts), 2 extras per person as backup
- Set daily merch targets, e.g., 50 Tier 1, 15 Tier 2, 5 Tier 3 per day
- Train staff to link merch to a conversation opener ("This is our new water bottle, do you travel a lot for work?")
- Run a 15-minute merch briefing on the morning of each event day
What drives results: Tying merch distribution to lead capture, every gift gets a badge scan. Staff who can tell the story behind each product. Cohesive team apparel, builds professionalism and booth visibility. Clear daily tracking of items distributed vs. leads captured.
What wastes merch: Leaving items on the table with no staff interaction. No connection between gift and lead capture system. Staff running out of Tier 1 items by noon on day 1. Mixed messages, different staff giving different items to the same prospect.
Why this step wins: Research from Exhibitor Magazine shows that 68% of trade show exhibitors say the event helps staff develop sales skills. Your merch briefing is a sales training session. Run it properly and every item distributed is a qualified interaction, not just a giveaway.
"Product tours and training events are at the heart of how we engage our reseller network. Merchandise plays a crucial role in strengthening those relationships, and Sunday makes it seamless." - Isabela, Global Channel Marketing Manager
Step 8: Post-event follow-up & merch integration
Best for: Pipeline conversion
The event ends. Most teams fly home, upload their badge scans to the CRM, and send a generic "great to meet you" email. The companies that win are the ones who reference the merch interaction in their follow-up, because the recipient still has your item on their desk. This creates a warm, personalised touchpoint that outperforms cold re-engagement. Plan your post-event sequence before the event, not after it.
Post-event activation playbook:
- Send first follow-up within 24-48 hours of meeting, reference the specific conversation
- For Tier 3 recipients: send a personalised note referencing the VIP gift
- Tag all event leads in your CRM with the tier level of merch received
- Consider a "post-event digital gift", a redemption link to your Sunday store for top leads
- Survey your team within 5 days: which products drove the most conversations?
- Track lead-to-opportunity conversion rate separately for event leads vs. other sources
Conversion boosters: "You mentioned you loved the bottle, here's where to get one for your team." Merch redemption links as a post-event nurture offer. LinkedIn connection with a photo from the event booth. Segmented email by tier, Tier 3 gets executive outreach.
Missed opportunities: Generic follow-up email with no event reference. Waiting more than 72 hours to follow up, recency fades fast. No distinction between Tier 1 and Tier 3 leads in follow-up. No tracking of event lead conversion separate from other leads.
Why this step wins: 76% of trade show participants can remember the business that gave them a promotional product for 12 months afterward, versus just 53.5% who recall a magazine advertiser after one week. Your post-event follow-up has a 12-month window of warm recall to work with. Use it.
"The merch creates the conversation hook. In our follow-up emails, we reference the specific product they received and our conversion rate from event leads is 2.4× higher than cold outreach." - Head of Demand Gen, B2B SaaS company
Step 9: Measure merch ROI, the right metrics
Best for: Justifying the investment
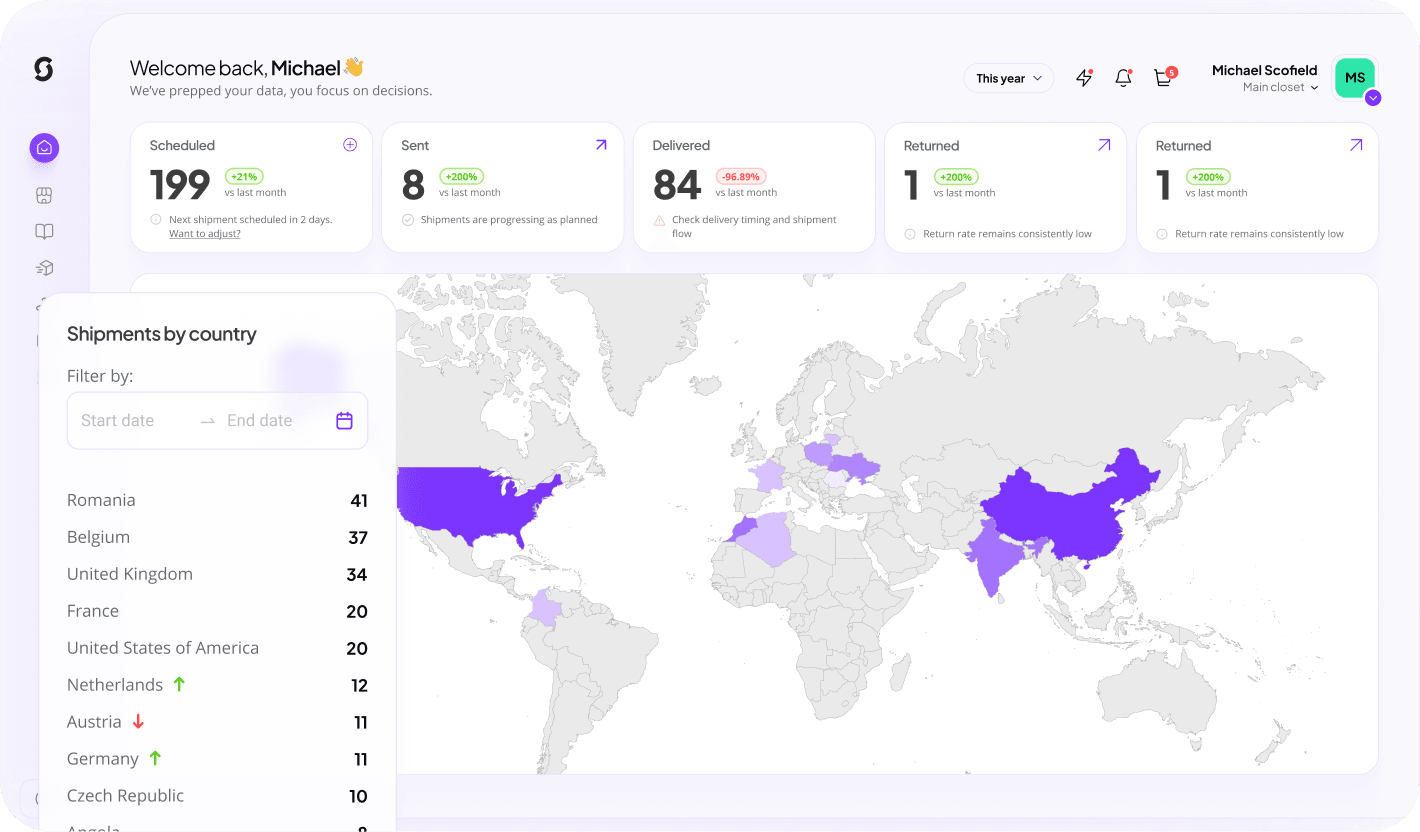
If you can't measure it, you can't scale it. Most event teams measure booth visits and badge scans but never connect those to the merch investment specifically. The framework below gives you the metrics that actually prove ROI, and help you improve product selection, tier ratios, and budget allocation for the next event. Sunday's platform dashboard tracks order history, cost per event, and inventory data automatically.
Key merch ROI metrics:
- Cost per qualified lead (CPQL): total merch spend ÷ number of Tier 2+ leads generated
- Merch conversation rate: % of merch interactions that resulted in a badge scan or lead capture
- Post-event conversion rate: % of event leads that became opportunities (track at 30/90/180 days)
- Brand recall: survey attendees 4 weeks post-event, can they name your brand from the merch?
- Cost per impression (CPI): unit cost ÷ estimated monthly impressions (avg: 344/month per PPAI)
- Merch utilisation rate: items distributed ÷ items ordered, aim for 85-95% to minimise waste
Strong ROI signals: CPQL below your average CAC from other channels. 90-day conversion rate above 15% for Tier 3 recipients. Staff report merch sparked 40%+ of booth conversations. Utilisation rate above 88%, almost nothing wasted.
Warning signs: Utilisation rate below 60%, wrong products for the audience. No CRM tagging, you can't track event lead conversion at all. Only measuring immediate sales, ignores 6-18 month B2B cycles. Same metrics every event, no iteration or learning loop.
Why this step wins: Teams that track merch-specific ROI metrics consistently increase their event marketing budget year over year, because they can prove the return. Teams that don't measure get their budgets cut. The data is on your side; you just need to collect it.
"We streamlined our global event merch across 700+ events with Sunday. We saved over 40% on total merchandise cost, whilst outsourcing all logistical hassle to them. Now we can focus on what really matters: creating experiences." - Triana, Head of Global Events
Step 10: Build a reusable event merch playbook
Best for: Scaling across 10+ events/year
The real competitive advantage isn't doing one event well, it's building the infrastructure to do every event well, without starting from scratch each time. A reusable merch playbook turns your first event's learnings into a permanent operational asset. Sunday makes this automatic: your brand assets, approved designs, preferred products, and order history are all stored in your Sunday brand store, ready to deploy in 30 seconds for the next event.
Playbook components to capture:
- Document your tier definitions, qualifying criteria, and distribution rules in one shared brief template
- Store approved products in a curated internal catalogue, categorised by event type and audience
- Build a 12-week milestone calendar template, reusable for every event with date offsets
- Capture post-event learnings in a standard debrief doc within 5 days of each event
- Use Sunday's brand store to enable regional teams to self-serve approved merch without central oversight
- Set annual volume targets to unlock bulk pricing across your entire event calendar
Playbook benefits: New team members can run an event from day one using the playbook. Consistent brand presentation across all global offices. Annual bulk pricing beats event-by-event ordering by 25-40%. Post-event data compounds, every event improves the next.
Scaling pitfalls: No central brand store, regional teams make inconsistent choices. No debrief discipline, same mistakes repeated across events. Over-standardising, not adjusting for audience differences by event type. Playbook lives in one person's head and is lost when they leave.
Why this step wins: Sunday's platform is the playbook. Every approved design, every supplier relationship, every order history entry, it's all stored centrally, accessible to your entire global team, and immediately deployable. Zalando runs merch for 400+ internal teams this way, saving hundreds of hours annually.
"We organized all Zalando internal merchandise through a Sunday internal merch store. The brand team once a year confirms the collection and all 400+ teams order directly from this platform, saving us hundreds of hours." - Zili, Employer Branding Manager, Zalando
The Sunday method: five operational phases from brief to playbook
These 10 steps aren't sequential silos, they form a continuous loop. Here's how Sunday customers structure the five operational phases from brief to playbook, and why each one feeds the next.
Phase 1: Brief & Budget (Weeks 12-10). Lock goals, timeline, target audience, and budget split before touching a product. Use Sunday's onboarding brief as your template. This phase prevents every expensive mistake that comes later.
Phase 2: Select & Design (Weeks 10-7). Choose products for each tier from the Sunday catalogue, apply brand assets, get mockups instantly, and run your internal approval process. Request physical samples for Tier 2+ items. Approve final designs no later than Week 7.
Phase 3: Order & Produce (Weeks 7-3). Place the confirmed order through Sunday's platform. Production begins immediately across the vetted supplier network. Live order tracking keeps you informed throughout. This window also covers customs documentation for international events.
Phase 4: Ship & Activate (Weeks 3-0). Sunday's logistics engine ships direct to venue, with event-date guarantee and real-time tracking. Your team runs the staff briefing, sets up the distribution system, and executes the tiered merch strategy on the show floor.
Phase 5: Measure & Iterate (Post-Event). Capture ROI data within 5 days. Update your playbook with learnings. Feed insights back into next year's brief. Over time, every event improves the previous, and Sunday's order history makes the data effortless to access. This is how you build compounding event marketing returns.
Real-world result: A European SaaS company managing 700+ events annually moved to Sunday's end-to-end platform and reduced total merchandise cost by 40%, cut turnaround time by 60%, and freed their events team from all logistical coordination, letting them focus on experiences, not spreadsheets.
All 10 steps: quick-reference table
Use this table to prioritise effort, assign owners, and check your status at each milestone across your event planning cycle.
| # | Step | Best for | Key action | Sunday help | Week target |
| 01 | Goals & timeline | Foundation | Write brief, assign owner, set milestones | Template | Week 12 |
| 02 | Budget allocation | CFO buy-in | Split budget across 5 categories; model unit costs | Live pricing | Week 11 |
| 03 | Product selection | Booth traffic | Define 3 tiers; select products from catalogue | 500+ catalogue | Week 10 |
| 04 | Supplier selection | Risk elimination | Evaluate lead time, quality, logistics, customs | Managed network | Week 10 |
| 05 | Design & approval | Brand consistency | Upload assets, generate mockups, get samples, approve | 30-second mockups | Week 8-7 |
| 06 | Logistics & delivery | Zero event-day stress | Confirm venue window, customs docs, direct shipment | Direct-to-venue | Week 6-2 |
| 07 | Staff briefing | Booth performance | Train team on tier rules, qualifying questions, apparel | Your effort | Week 1 |
| 08 | Post-event follow-up | Pipeline conversion | Personalised outreach referencing merch interaction | Redemption stores | Day 1-3 |
| 09 | Measure ROI | Budget justification | Track CPQL, conversion rate, utilisation, brand recall | Cost reports | Week +1 |
| 10 | Build playbook | Scale & repeat | Centralise brief, catalogue, designs, and debrief docs | Brand store | Ongoing |
Ready to plan event merch the right way?
Your branded merch store, live in 30 seconds. 500+ products, instant on-brand mockups, global logistics, and zero platform fees. Start free, pay only when you order.